
| Alisa > Quick start > | Mid range | Close range | Chainsaws | Reference |
|---|
 ALISA QUICK START KIT
Alisa is a character that excels at creating whiffs, with her exceptional movement, wide array of pokes, and versatile whiff punishers. New to Tekken 8, her keepout is now just below the best in the game. Against defensive opponents, her chainsaw mode offers medium risk, medium reward mixups and chip damage. She integrates well with the heat system, enhancing all her core strengths in heat.
Alisa can be played in a very beginner-friendly way, but also has much to perfect for the specialist. If any of the above appeal to you, or you simply find Alisa cute, this guide will help you build a basic gameplan for mid range and close range, and point you to further moves to incorporate in your gameplay.
| Mid range | Close range | ||
|---|---|---|---|
| Whiff creation | ☆☆☆☆☆ | Whiff creation | ☆☆☆☆☆ |
| Keepout | ☆☆☆☆ | Mixups | ☆☆☆☆ |
| Approach | ☆☆☆ | Counterhits | ☆☆☆ |
| Block punishment | ☆☆☆ | ||
Mid range game
When you begin a round, the safest option is a single backdash. Here, you enter mid range (also called neutral), a range where most of your and your opponent's moves, apart from dashing or running moves, will whiff.As an Alisa player, you want to maintain mid range when possible, and only enter close range on your terms — often with chainsaws out. Practise recognising the range on Alisa's f+2 (about range 2.7 in the in-game frame display): inside it is close range, outside is mid range!
Keepout
Keepout is the easiest mid range tactic to master, since it does not require much knowledge about the opponent's character. Simply hang out at range and throw out one of these moves preemptively any time your opponent might approach.
 u+2 is Alisa's strongest keepout button and one of the longest keepout moves in the game. On hit, you enter close range in destructive form and heat (→ heat engager). On block or whiff, either exit destructive form safely with d+1+2, or use DES f+1 to catch too slow retaliation (→ destructive form).
 f+2,1 is a keepout mid that covers the weaknesses of u+2. While u+2 as a high cannot keep out low profile approach and can be baited out and ducked, f+2,1 is a mid that catches both. It is slightly shorter than u+2, so you have to wait for your opponent to enter your range before using it. On hit, the situation is exactly the same as after u+2 (→ heat engager). On block, you are punishable at -12, so place your move with purpose.
In heat both u+2 and f+2,1 are cancellable into a heat dash with u+2,f and f+2,1,f for a full combo.
df+2 is a mid like f+2,1, but requires some experience due to its short range. Placed well, it is a full launcher without resources.
f,f+1+2 is great for counterhitting approach moves with slow wind-up, such as Dragunov's WR+2. On counterhit, 3,2 is guaranteed, but the reward on normal hit is rather low.
b+1 is Alisa's move of choice to stop Mishima approach. Since b+1 recovers crouching, it cannot be whiff punished with an electric. It can also float airborne approach moves, such as Claudio WR+2.
Jab and df+4 are universally strong, but difficult for beginners.
Further options
Approach
If you play your keepout successfully, your opponent will hesitate to approach. They may actively try to make your keepout whiff by moving outside of your range, or they may freeze without an answer. Either way, you can now move in.
Alisa does not have oppressive approach moves as fast as Reina's f,f+2 or as hard to whiff punish as Dragunov's WR+2. Closing the distance is rarely Alisa's preference, but she does have options to catch a passive opponent.
 WR+2 is a long range high that leaves you at an advantage on block, and can enter destructive form with WR+2,1+2. On hit, follow WR+2 with f+1+2 and return to mid range game. On block, you enter close range at +5 in either normal stance or destructive form. It is possible, albeit difficult, to choose to enter destructive form only after seeing your WR+2 get blocked. If you accidentally enter destructive form on hit, DES b+1+2 will hit many wakeup options and is safe to attempt.
Vary your approach by simply dashing up into a close range button such as d+4, b+1 or jab. This is preferable to mixing WR+2 with other ranged moves because WR+2 has so many weaknesses that it is difficult to predict your opponent's answer: duck, sidewalk left, sidestep right, or floating it out of the air. Whichever option they choose, you can use this time to dash in and start your close range offence.
WR+3 is a mid that starts your close range offence at -4 on block. The extension WR+3,4 is natural, when you want damage over frames. Like WR+2, WR+3 loses to sidewalk left and can be floated.
d+3 is a long range low that leaves you in backup stance. On hit, follow with the uninterruptable backup 1 or backup 4, or use the opponent's hesitation to wait the stance out and go for a crouching mix. On counterhit, d+3 is a full launcher. Beware of advanced opponents who can duck and launch d+3 on reaction.
f,f+4:1 is a safe, high damage mid. While it doesn't let you pressure on block, its longer wind-up makes it a nice timing mixup to WR+2, often allowing it to automatically whiff punish keepout jabs.
Further options
Whiff punishment
If your opponent stays back and presses keepout buttons of her or his own, your best bet is often to dash in then dash out to make the move miss. Test the opponent's patience by hovering around the border between mid range and close range, and focus on punishing any whiffs.
Beginners to Tekken are recommended to use the same moves here as for keepout, u+2 and f+2,1, for less to memorise. For others, Alisa has a very versatile kit of whiff punishers for tailoring the range, risk and reward to your preferences.
 3,2 is Alisa's default whiff punisher. It is fast at 13F and has long range to complement Alisa's strong backdash. On hit, it is a heat engager. On block, it can be ducked and launched, but if your opponent does not duck, at only -2 you have the same options as after u+2 on block.
 Use df+2 for more reward on a successful whiff punish. df+2 does not quite have the range of 3,2 but leads to a full combo and is safe on block.
In heat it is possible to use u+2,f or f+2,1,f for even more range and reward.
b+4,4 is a nice upgrade over 3,2 for relatively small whiffs, having more range and leading to a mini-combo. As a back input, it is immediately available from backdash or sidestep block. On block, it is launch punishable if you do not enter boot stance, and floatable if you do. Always enter the stance against players who know.
b+3+4 is the best long range launcher when you backdash a big move and df+2 would not reach, but it is launch punishable on block. Do not use from a sidestep, as the off axis combos are not good.
1,1 is great for experienced players to punish very small whiffs.
Further options
Summary of mid range game
Here is a summary of Alisa's unique options at mid range. Generic tools, such as jabs and movement options, are outside the scope of this guide, but become just as important to Alisa as any other character as you level up.
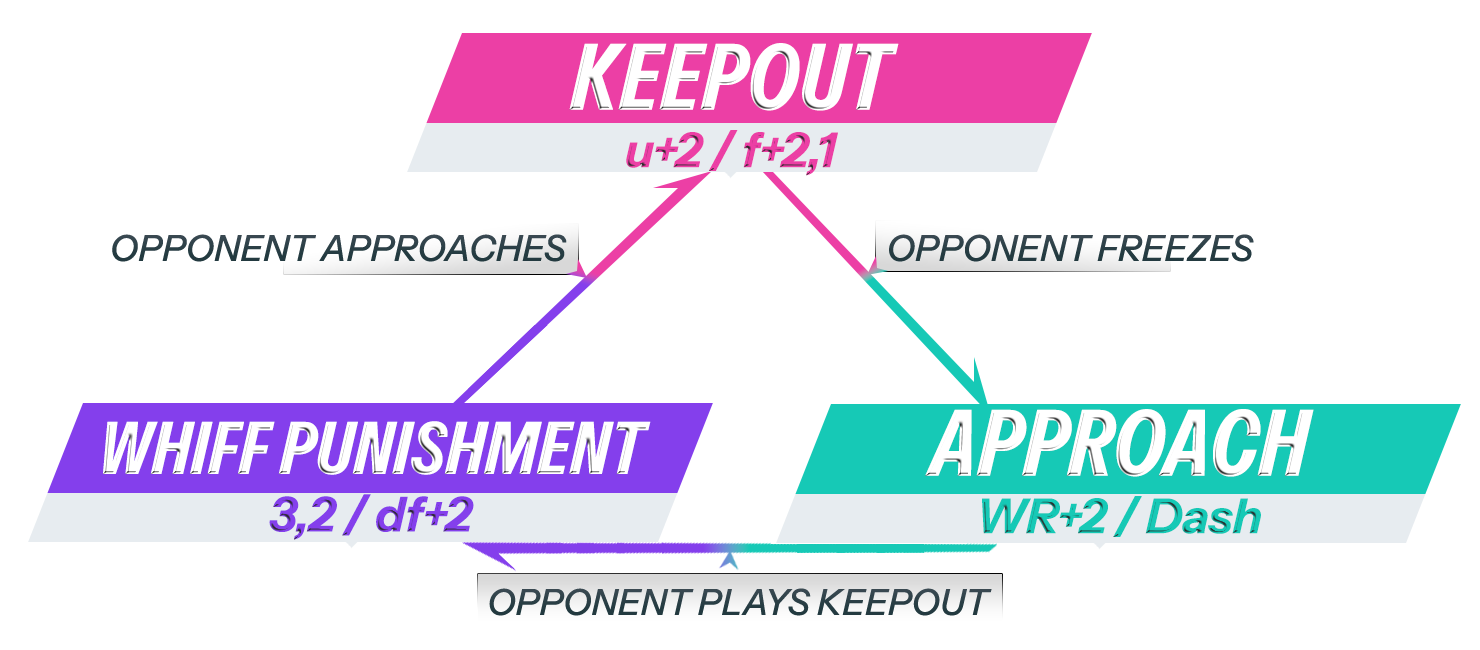
Showing your keepout moves makes the opponent wait. When the opponent waits, it's on you to approach and carry the match on. Seeing you approach makes the opponent want to keepout, which you can wait out and whiff punish, but waiting again makes the opponent approach, looping the rock-paper-scissors.
Beginning players might only know one link of the cycle — say, they only want to attack you. If you sense this, keep doing what works. Against players who are aware of the full cycle, the fun is in predicting when they will change gears!
Close range game
If mid range game revolves around controlling space, close range game emphasises the dimension of time. Every time you make contact with the opponent, you will be left at a defined frame advantage or disadvantage.
In normal stance, Alisa thrives at small frame disadvantage, where the opponent has an incentive to press a button which she can sidestep or backdash then whiff punish. This is different from traditional mixup characters, like Devil Jin, who establish frame advantage to go for a high damage low or mid.
When Alisa gets a turn by either blocking an opponent move or hitting a move of her own, let the opponent block pokes such as f+2 and df+4, to trade your plus frames for small minus and create an opportunity for Alisa.
Core offence with f+2 and d+4
Alisa's most important offence starters are the mid f+2 and the low d+4. Both start a three-way mixup when the opponent blocks standing. f+2, a mid, will be blocked, leaving you at -4, and the low d+4 will hit, leaving you at -1.
f+2 → sidestep. At only -4 on block, f+2 sets up an opportunity to sidestep. If the opponent answers with an immediate button that is not homing, and you sidestep in the appropriate direction, you can make the button whiff and whiff punish it with 3,2 or df+2.
f+2 → extension. If the opponent catches your sidestep with a homing move, with a move you don't yet know how to sidestep, or with a low-risk move that is hard to whiff punish such as a jab, you can stop all options by finishing the string f+2,1. On hit, it is a heat engager before heat, and a launcher in heat. The risk on block is small at only -12.
f+2 → mixup. When the opponent is wary of your sidestep or the extension, they will freeze after blocking f+2. Now is the time to go into destructive form with f+2,1+2 and make them regret playing passive by mixing strong lows and mids such as DES d+1 and DES 1.
It can be scary to press slow moves from minus, but this is an essential risk to incentivise the opponent to answer with moves that you can sidestep and launch. Remember your goal with f+2 is to make the opponent retaliate!
Exercise 1. Recognising whiffs
Set your practice dummy to block and retaliate with a move (offence practice, first action standing block, second action punish). Record three Asuka moves: the mid b+4, the low db+3 and the homing f+4.
Attack with f+2. When the dummy blocks it, sidestep right by tapping and releasing d on P1, or u on P2 side, then press b to cancel the sidestep into a block. Get a feeling for how long your sidestep needs to be to evade the mid and the low, and how fast you need to block to stay safe from the homing. When comfortable with the correct sidestep length, add a whiff punish if a move whiffed: easiest 1,1, harder 2,2 or 3,2, best reward df+2. Do not press if you block the homing.
Sidestep direction changes depending on the opponent's character, but useful sidestep length before blocking is relatively constant.
Exercise 2. Hit confirming into sidestep
Change first action from standing block to random block.
Repeat exercise 1, but now watch closely if your f+2 hits or gets blocked. On block, sidestep block as before. On hit, take your turn with a move such as df+2 or another f+2. Keep your mind clear and ready for either outcome while attacking.
Accuracy at hit confirming your pokes greatly affects your progress as an Alisa player and with Tekken in general.
Exercises
d+4 has a very similar mindgame to f+2, with the three options of sidestep, the extension d+4,1+2, or a mixup such as f+2 or d+4. Like many lows, it is minus on hit, but at only -1, Alisa can sidestep even more moves than after f+2 on block. The tradeoff is that d+4 cannot transition into destructive form, so you may need to work harder to make the opponent press buttons for you to sidestep.
Creating whiffs with pushback
While f+2 and d+4 work well against players who block at frame disadvantage, starting your offence with them always carries a risk. f+2 is weak to sidestep right, and d+4 loses to low parry or hopkick. For a default action at small frame advantage, such as after hitting a 1,1 punish or approaching with WR+2, you can always fall back to faster, less risky moves.
df+4 is Alisa's fastest mid at 12F. As a rule of thumb, it catches sidesteps and sidewalks when used at +4 or better, making this move very safe to use after hitting almost any move. On hit, you are left at +4 and can either loop into another df+4, or start your regular game with f+2 or d+4. On block, it pushes the opponent away just enough so their shorter moves cannot reach you, so backdash and be ready to whiff punish with 1,1 or 3,2.
uf+1+2 is a 12F command throw. It does good damage on hit, and has great pushback on break. See what your opponent does after breaking your throw: if they attack recklessly, you can often get a big whiff punish with 3,2 or df+2. If they hesitate, you are back to Alisa's preferred mid range game!
Exercise 1. Recognising whiffs
Set your practice dummy to block and retaliate with a move (offence practice, first action standing block, second action punish). Record four Asuka moves: df+1 into block, df+1,2, dash block, dash into 4.
Attack with df+4. When the dummy blocks it, backdash and watch the opponent for a whiff. React with 1,1 or 3,2 quickly enough to whiff punish df+1,2 between the hits. Do not press anything without seeing a whiff: "wish punishing" is dangerous if the opponent only dashed in.
Exercise 2. Hit confirming into backdash
Change first action from standing block to random block.
Repeat exercise 1, but now watch closely if your df+4 hits or gets blocked. On block, backdash and whiff punish as before. On hit, take your turn with a move such as jab or another df+4. Keep your mind clear and ready for either outcome while attacking.
Exercises
Pushback situations carry very low risk, but they are also easy to counter with a simple dash block or backdash, refusing to press into the trap. Against defensive opponents, play more f+2 and d+4.
Taming the masher
Now that you have four moves to use for close range offence, it's time to deal with opponents who try and steal your turn. Jabs, crouch jabs and power crushes can beat your offence in speed, while hopkicks and backsways can evade your moves even from heavy disadvantage. Many players will have a habitual panic button which you can observe and maximise your punish for.
df+1,1,2 is a fast mid counterhit string for 60 damage and destructive form. Use this at frame advantage when you predict your opponent will challenge with non-armoured buttons such as crouch jabs. Third hit can be ducked and launched, so stop after the second hit if you see they didn't press.
d+4,1+2 and throws, especially 2+4, are good to beat power crushes but lose to crouching and jumping. 2+4 heals the most recoverable damage out of all throws in the game, while also being homing like all generic throws.
Finally, step block or f,N is the safest way to bait out a turn stealing move. Unlike dashing with f,f, stepping forward with f does not break neutral guard, so you autoblock as soon as you release f. Use this at frame advantage when you predict some kind of challenge, but are not sure what. Block punish any power crushes, rage arts, hopkicks or backsways. Especially good for round ends.
Destructive form
Destructive form
In destructive form, Alisa seeks to maintain constant frame advantage for a flurry of mixups. Use normal stance to dismantle an aggressive opponent's offence, and destructive form to crack a patient player's defence.Under construction for season 2
Reference
Block punishment
When you block a punishable move, there is no mindgame: take your guaranteed damage and move on. Here is a list of Alisa's common block punishers. If you are a beginner, focus only on the small punishes from standing 1,1 and crouch WS+4, and on the launch punish uf+4,4, available both from standing and crouch.
| Standing punishment | Crouching punishment | ||||
|---|---|---|---|---|---|
| 10F | 1,1 | → small advantage | 11F | WS+4 | → small advantage |
| 12F | 2,2 | → mid range | 13F | WS+1,2 | → small advantage |
| 14F | f+3,2 | → mini-combo | 15F | uf+4,4 | → full combo |
| 15F | uf+4,4 | → full combo | 17F | WS+2 | → full combo |
After 1,1 and WS+1,2, you can opt to enter destructive form with 1,1,1+2 and WS+1,2,1+2 for more pressure (→ destructive form).
Use b+4,4 and u+3,2 to punish moves with pushback on block.